
I made this sweater. Doris Chan makes such beautiful things. Sadly, the patterns she writes are SO difficult to understand! I've had that problem every time I try her stuff.
She is very unclear most of the time, but this particular time there was a weird jerkiness to the pattern steps.
Let me explain - each of the sizes were written as a separate pattern.
Each pattern used rows from other sizes as pattern steps.
For example, for size 54 ~
Size 54
Rows 1-7: Work same as Size 51 Rows 1-7.
Row 8: Work same as Size 39 Row 6.
Rows 9-17: Work same as Size 39 Rows 7-9 3 times – 49 pattern repeats.
Ok, then so size 51 it is!
Size 51 has clear instructions for rows 1-3, then it gets crazy -
Row 4 (inc): Work same as Size 36 Row 5.
Row 5 (inc): Work same as Size 39 Row 6.
Rows 6-7: Work same as Size 42 Rows 5-6.
Rows 8-17: Work same as Size 36 Rows 6-8 3 times, Row 6 once more – 50 pattern repeats.
You pickin' up what I'm puttin' down? K, good, because I don't want to cut and paste the whole mind twisting pattern(s).
Yeah, so if you have even the tiniest distraction at any moment of making the row or in between making these rows, you're gonna screw up. All of the patterns are on different pages so I ended up with 4 tabs open and highlighting the rows I was on to keep them straight.
The good news is that once you make the yoke and arm openings, you join them all ( in a different way for each size of course) and from then on for a few inches in length you just make the same stitch. Then you increase in one row and make more of the same stitch. The sleeves are just as easy and if you've ever made afterthought ribbing, then you're set. If not... well, it's not for beginners. But it's pretty simple once you have the hang of it.
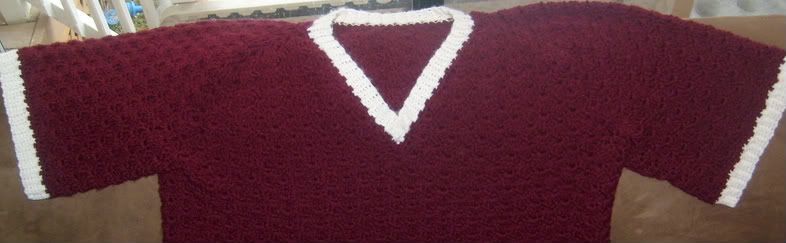
Now, how the finished product turned out. I love the fit, it's awesome, really. If I were gonna get picky, I would say that the length was a bit short and I had to add 4 extra rows to get it to a comfortable length for me on the body and two additional rows to each sleeve.
All of that I can deal with, but I am not too pleased with the section where the sleeve joins the body. There is a strange pouf of bunched up sweater because the increases forming the shoulder weren't as shaped as they should have been, there were too many increases and it gave the shoulders a shrugging appearance. I only made the larger size, this may not be an issue with the smaller sizes.
See here, it's much clearer when I am not wearing it. Do you see the upward curve on the shoulders? Then, look at the diagonal from the armpit up to the neck. Do you see those bumpy looking parts? This is laid out my curved couch, it's actually a little more noticeable than that when laid flat.
I would call this an intermediate to difficult pattern and no matter what level you've mastered, be prepared for some frogging and serious swatching.
All in all, it makes a cute sweater with a couple of changes. I am glad I made it!

No comments:
Post a Comment