It came along nicely for the first 6 inches or so, but then I noticed a flaw in my pattern- namely, I had overlapped the same skein of yarn. I was using the same color in two sections simultaneously but hadn't planned ahead for it. I had to cut the thread and then wind off a bunch. It ruined the smooth flow I and since I lost that flow, I started crossing threads and screwed it all up. Every so often I got frustrated and had to put it down, but I persevered and I am proud to say it's about half finished. My oldest son is personally invested because he helped me design the mat and he has been sure to check up on me repeatedly. i wish I had chosen a lighter shade of dark blue, but I can't change it now and who knows, the kids might not mind.
I'll take a picture tomorrow if I can find my camera... I love how creative my kids are, how artistic, but I H.A.T.E. how they love to sneak off with my camera and take pictures. I love those pictures, I hate losing my camera and hate the chance of it breaking, but I can't be mad at them, understand. I really love the surprise when I look through my pictures and see our live from a child's angle. Might be the best photography I've seen, and my stepmom is a talented photographer. In fact, my avatar, the picture of the hand? It was taken by my stepmom, but she let my oldest boy call all the shots; angle, lighting, subject, all of it. He sees something I don't when he looks through the lens.
Anyway, when and if I find my magically missing camera, I'll take a picture of the mat as well as a small side job I did in embroidery. A friend found a picture of a piece of cloth embroidered with blue lines and a red margin, black thread in 'cursive' on it and she fell in love. had to have it. So... of course I made it. I haven't told her I did, it's a surprise, but I don't think she even knows I HAVE a blog, so it won't spoil anything for you all to see, will it? I finished a 4T cardigan as well made in very lovely purples.
Thursday, January 28, 2010
Wednesday, January 20, 2010
Today - PLAY DOUGH
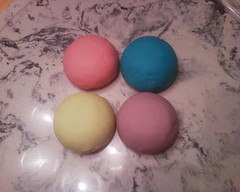
playdough
Originally uploaded by Meroluni
I love making things myself, I love natural alternatives to store bought, chemical laden products, and I love being sentimental. This project was a trifecta, I got all in one.
When I was little I remember my mom making us playdough. Since she didn't allow us to buy any Play-Do this was wonderful. I watched her in amazement as she spent no money and very little time to make us what was a forbidden and expensive treat normally. She only had one food dye color, though, so our new toy came out a fleshy nude color, making everything we formed from it look lewd and suggestive. Which was great fun by itself.
Now that I am a grown up and a mom, I am in my mother's shoes, living the same life she lived and seeing from her perspective. It's fun as well as difficult. Tonight I was reading updates on Facebook and my friend Donna posted about the strength it takes as a mom to not jump in and prevent the children from making, as a friend of hers called it, grey-dough. She toyed with the idea of making a batch for herself so that the colors stay pristine.
This brought up a host of fond childhood memories and I HAD to make a batch. Thinking about my three boys, I decided on a double batch. Mike had thoughtfully remembered that I was in search off food dyes and bought me two sets he found on sale last week.
1 c Flour...check.
1 c Water...check.
1 tsp Cream of Tartar...check.
1/4 c Salt...check.
1 tsp oil...check
Dye... check.
Alrighty! Mix all ingredients in a pot over medium heat. Stir constantly til smooth and forms a ball that pulls away from the sides. Careful, this happens fast!
I dropped the ball of dough onto the counter to cool. It is still super soft and squishy, but I started kneading it as it cooled and it firmed up a little. I had to dust the counter with a little flour to keep it from sticking and to firm it up a little more because I didn't cook it quite long enough.
Then I cut it into quarters and put 6 drops of dye into a fingerprint depression I made in the top of each ball of dough. Knead carefully to avoid splashing dye on the counter or you could be smarter than me and knead it on a non-staining surface. I doubled it to getthe amount you see in the picture and each one of those is about 2/3 c.
I made the kids play with it on a giant lazy susan to keep things fair and equal as I could. Store in an airtight container. I plastic yogurt container would be perfect, but I don't have any at the moment and I am not risking my glass jars, so Ziplock baggies it is!
I love being Mom.
Saturday, January 16, 2010
Step one
Last night I printed up some graph paper and got started on the kid's playmat. WOW, I gave myself a migraine. It's big, 42x42 and I had to use two sheets just to lay it out.
I asked my oldest son to share some of his ideas because he loves the math and symmetry to crochet. He has asked me to teachhim, but it's too sedentary a hobby for a growing boy and he quickly loses interest. Pattern conception, however, is right up his alley. He drew me a 'plan' last night as a visual aid. there is a big train track with an engine, a really squiggly road, and a big lake all populated by random people, cars, and trees. the road might not work without some tweaking, but he is really fun to collaborate with and i look forward to the challenge.
My 'plan' is now done. There is a straight railroad track across the top, brown rail road ties intersected by silver/gray track and the background is a tan-brown with random edging to simulate dirt. To the left side of the mat and crossing over the tracks is a road, black with yellow lines down the center, white 'stop here' lines on either side of the tracks, and it also has a tan 'dirt' edging. The road is straight til just after it crosses the tracks, then there's a T intersection and that crossroad is all curvy. not squiggly, but definitely not straight.
The straight lines were easy peasy, the random edges, meh, it was more about the organic flow than precise lines, but the curvy road - that was HARD. It was only natural to me to keep the edges of the road the same number of squares apart on the graph, but that resulted in pinched looking tarmac and an awkward collision of numbers and feel. Ugh. Right about then I discovered that an eraser on a #2 pencil can make graph lines disappear.
I went with the look and feel as a priority because after all, this is for little kids. The lake was super easy as well since it SHOULD be wavy and I placed it in the lower right corner to counterpoint the track and road intersection in the top left corner.
Are you with me so far? Hopefully you can visualize it all fairly well. Last night my 6 year old was haltingly trying to explain what he was thinking and it made little sense, so he paused, tilted his head to the side and asked me, Mom, do you know what visualization is?
This led to him needing to literally draw me a picture because it seems I really have no idea how to visualize with him.
Back to the concept at hand. the road, track, and lake seem fairly simple to place on a big square and the spaces left are going to be green. Like the tan 'dirt' edges, the green will have a paler green edging where the grass is close to the dirt. There is a dirt rim around the lake as well and then the lake water will be pale blue for shallows and dark blue for depths.
Breathe in, breathe out, visualize with me. Are you there? OK, moving on to much simpler ideas.
There will be vehicles on land and water - a little flatbed pickup truck, a sedan, a train engine, a sailboat. There will be a home with a nice front porch, a general store, a stop sign, and a RRx sign. Pine trees, small bushes and flowerbeds for landscaping.
All of these are going to be stuffed and flat bottomed to stay upright on the mat, and I am considering a couple of fish stitched onto a coin-shaped blue background for the lake. i don't know about people or animals yet, there are a lot of details and pieces as it is and I fought off a migraine just dealing with THIS much last night.
I sort of tossed ideas around for a vest, but it was too much for me after the small town I just created. My Mick wants a mountain now. thankfully that is really easy. This is going to be a huge project!
Friday, January 15, 2010
back in the saddle
I've gotten so spoiled using other people's patterns that I nearly forgot how hard it is to write the darned things myself. I used to use my own exclusively but then I got entranced with the ingenuity and creativity I saw from other writers.
I have plans to make two projects and keep the patterns for later use. First, I want to make a play-mat for the boys. they love that sort of thing and it's really hard to find in crochet.
I'm going to make it with~
*a train track
*tarmac roads
*a lake
*surroundings with green and brown as grass and dirt.
*I'm also going to make a few little things to go with it, like vehicles, buildings and animals.
Graph paper is definitely in order for that one! Any suggestions are welcome.
Secondly, I want to make a vest for myself. Finding a vest pattern that isn't a spiderweb or a big blocky thing from the 70's or 80's is difficult enough, but a cute vest in my size is nearly impossible. I did find a few, but they're not really my style. I have a short waist and a large bust as well as a large rear, so the long vests are not exactly flattering.
I am looking to make a pattern that has~
*narrow straps (not spaghetti strap, but I would like to avoid the big wide shouldered 'sleeveless' look)
*a deep V neck that covers my belly button, but not that covers to my collarbones
*large arm openings so that there isn't any uncomfortable rubbing or conversely, tight arm seams that restrict movement
*a waist that falls naturally on my own with a hem that ends at mid hip.
Right now I have a couple of projects to send out, but I'll be updating daily from rough drafts, to the WIP, to the finished object.
Subscribe to:
Posts (Atom)